Monday, January 31, 2022

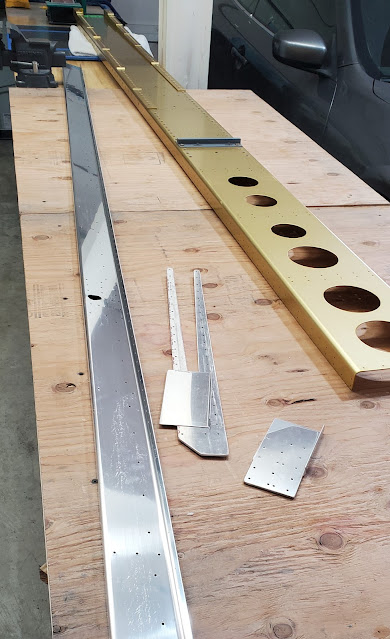
Right Wing - Rear Spar Assembly

I think my posts are going to get a little boring for the next few months since I'm repeating the exact same build steps as on the last wing.  I definitely wish I could have built both wings at the same time.  While the actual build steps are slightly faster the second time around, it's been long enough since I did the work on the left wing that I have to revisit all of the head scratching areas to ensure I understand things like which rivets to leave out until later on in the assembly.  It would have been faster had I been able to do both left and right assemblies each time I spent the 15 minutes figuring something out.  That being said, even a few days is enough time to not remember details like that, so it may not have mattered in the end.

Tonight I finished assembly of the rear spar (after I read and re-read the plans to remember which rivets to leave out - at least I did have the other built wing assembly to reference, which did help jog my memory).


With this done, tomorrow I'll get the right front spar out and start setting up and drilling ribs.  Once that is done I'll need another semi-warm day to spray primer on the ribs so I can get spar up on the wing jig.


Sunday, January 30, 2022

Right Wing - Rear Spar Priming

Today got up to almost 50 degrees for a few hours, which meant I had to try to do at least a little priming.  I match drilled all of the rear spar doublers, deburred and scuffed everything, cleaned it, and gave priming a shot.


The priming worked okay, but the cool weather makes it pretty tough to lay down smooth coats.


Saturday, January 29, 2022

Right Wing - Rear Spar

I finally decided that I may as well swap everything over and start working on the right wing instead of just twiddling my thumbs waiting for the weather to be warm enough to finish sealing the left tank.  I pulled the left wing off of the stand and put it onto the wing cradle I built a while back.  The cradle is actually for the finished wings, so it doesn't exactly fit a partially finished structure with no leading edge, but it'll work for temporary storage.  I just attached a few blocks on it to keep the spar in place.


And just like that, it's time to start all over again.  I deburred the edges of the rear spar and all of the doublers.


Sunday, January 23, 2022

Left Wing - Fuel Tank Sealing

I couldn't put it off any longer - time to deal with the proseal (the stuff from Van's is actually from Flamemaster, so technically not "ProSeal," but proseal is what everyone still refers to it as).  The first place to get my hands dirty is the tank stiffeners.  Any surface that gets touched by proseal has to be clean of any oils, so I first cleaned everything with acetone until I had no more residue on the rags. The rivets also have to be clean, so those got a quick bath in acetone as well.

The stiffeners can be back riveted.  Before I mixed up any proseal, I got all of the rivets in place and taped over.


Once I started mixing the proseal, taking pictures was the furthest thing from my mind.  This stuff is sticky sticky sticky!  It's mixed in a 10:1 ratio by weight and was a lot harder to mix than I anticipated.  I'm sure it was a little thicker than normal just due to the cold temps.  All I can say is that it'll take me another 20-30 tanks before I can make one as clean as in Van's Youtube "how to" video.  Something about the consistency of the proseal just makes it really hard to control where it goes.  I buttered each stiffener back and then wiggled them into place over the rivets.  That part was deceptively clean to do and made it seem like I could pull this off without making a mess.  Once the riveting starts, and especially as the excess gets smoothed out with a tongue depressor, the mess got harder to control though. I eventually gave up and stopped trying so hard to keep it off the verticals of the stiffeners.  The diameter of the tongue depressors is too big, which causes the proseal to spread out more than I needed it to as I made fillets.  I ordered some smaller popsicle sticks to see if that helps for the next round.  The proseal getting onto the skins/stiffeners where it's not really needed doesn't matter of course.  It's just more of a mess to work around.


The last step to sealing is to dab the rivet heads with proseal.  


Up next was the fuel filler flange.  I ended up back riveting this as well.


This was messy, but even though it looks bad, it wasn't as bad as the stiffeners.  I think it actually would have ended up very clean if I had the smaller popsicle sticks to use around the perimeter.  The large diameter of the tongue depressors made them push the proseal up over the lip of the flange by the time the fillet was created.


Last up, the fuel drain flange.  This is a bit different since it gets proseal between the outside skin and the flange (the flange is on the outside skin surface). I kept the amount of proseal pretty minimal for this - just enough to barely squeeze out around the perimeter.  After squeezing the rivets with my 4" no-hole yoke, I rubbed it all down with acetone to clean up the excess proseal.


Saturday, January 22, 2022

Left Wing - Fuel Tank (11)

By the time I got out to the garage tonight it was really too late to jump into proseal and riveting.  There's always something to do for another step though.  The Z brackets that hold the tank to the wing spar need to be primed.  I will have to prime a few of the outside surfaces of the tank once it's built, but getting the brackets covered on all sides would be pretty tough at that point.  The bottom portion of the bracket that connects to the tank needs to get proseal around the blind rivets, so I didn't prime that part of it (don't want the primer to interfere with the ability of the proseal to stick).  I can prime that part later, so I taped off that portion.


I normally would have pulled out the rattle can primer for these parts, but I've developed quite a hatred for that stuff.  The brand I got smells incredibly bad, and it takes a couple of days for the smell to disappear, even if I spray it outside and just bring the part into the garage after it's dried.  I will eventually try another brand, but in the meantime I figured I'd take advantage of the best characteristic of the waterborne primer I bought from Stewart - the fact that it doesn't have a pot life, so leftovers can simply be stored and reused later.  I don't want to pull out my big spray gun every time I need to spray a few parts though.  The cleanup is easy, but still a pain.  So I bought a super cheap airbrush kit from Harbor Freight to take place of the rattle can.  The primer can be kept in the little glass jar after use, and cleanup is as easy as spraying a bit of acetone through the tip.  This is super low tech stuff - the air passes over a tiny tube and the vacuum created pulls out and atomizes the paint.


The airbrush isn't perfect of course, but it worked every bit as well as the rattle can would have, and I have the comfort of knowing how good the Stewart primer is once it hardens.  I was impatient, so I threw the parts on top of the propane heater to dry them in a matter of seconds.  Then I riveted on the nutplates that will attach to the wing spar.  All of the brackets get nuplates except for the inboard most one.  For that location, the nuplates are on the wing spar itself.


Tuesday, January 18, 2022

Left Wing - Fuel Tank (10)

It looks like the exact same pile of parts from yesterday, which it is.  They are simply all dimpled and ready for assembly now.  So the dreaded proseal is next.  I hear lovely things about it.


Monday, January 17, 2022

Left Wing - Fuel Tank (9)

Back at it!  My goal for today was to spend a few hours getting the left tank prepped and ready to be cleaned and dimpled.  I pulled everything apart and started the long process of deburring all of the holes and edges in the skins, ribs, baffle, z-brackets, stiffeners, etc. 


After everything was deburred, then any surface that will get proseal on it during assembly had to be scuffed.  Next I will dimple the skin and other parts, then after cleaning everything with acetone they'll be ready for assembly and sealing.


Sunday, January 9, 2022

Left Wing - Fuel Tank (8)

Today was a day for distraction, so I finished the last of the left fuel tank assembly.  The inboard rib access cover gets attached to the rib via flat head screws into nut plates that are riveted to a doubler ring on the inside of the rib.  I oriented the cover and drilled all of the screw holes through the rib, the clecoed the doubler ring to the other side of the rib and drilled the nutplate holes.


The rib itself gets dimpled for the nutplate rivets so they are flush on the outside of the tank. This is because the access cover will seal with a gasket and needs a flush mounting surface.  The doubler ring is thicker material, so is countersunk.  With all of that done and with all edges and holes deburred, I riveted the nuplates and doubler ring to the rib.


The fuel filler cap/flange are already drilled.  The plans say to match drill them, but that must be for older parts, because these are already drilled to the final size and match up already.


The filler flange is countersunk on the outside surface to accept the skin dimples.  I made a small retaining loop out of scrap aluminum - this will get riveted to the flange and holds the end of the fuel vent line.


Lastly, I lined up the center hole of the fuel drain flange and match drilled the skins.

At this point, the only remaining step prior to actually building the tanks is to deburr all holes and edges, then clean everything up and scuff the necessary parts for proseal adhesion.  I can't say that I'm looking forward to the mess of proseal, but I'm sure it won't be as bad as I make it out to be.  From what I gather, it'll take many, many days of work to do the tank build.

Saturday, January 8, 2022

Left Wing - Fuel Tank (7)

It's felt like an eternity, but I finally got back out to the garage today!  It's still really too cold to do any priming, so I'm just tying up loose ends of prep work for the skins and fuel tank.  I started out by deburring the leading edge skin and finished the remainder of the leading edge ribs (things that can be done with gloves on!).  Once I'm ready to prime I will have to take some fine sand paper to the inside of the leading edge skins, as well as the fuel tank skins.  The wrestling that was required to get the ribs to fit caused some scratches that need to be smoothed out.  It sounds like that's par for the course for these areas though.


Last week I received the replacement end rib for the fuel tank.  That means starting over with fitting it to the skins.  It was definitely easier to fit the ribs all at once.  Trying to get a new one in place without removing all of the others was kind of a bear.  I ended up having to remove a couple of other ribs to get enough flexibility in the skin to match drill the new rib.  The next step was to drill the new rib for the attach bracket.  This is the part that I miss-drilled before and caused the need to replace the rib.  Everything is easier the second time around though.  This time I pulled the rib out so the bracket could be clamped in place for drilling.


Once the rib was match drilled to the angle I put the rib back in place so the inner plate could also be match drilled.  This plate is simply a piece of aluminum that lays against the nose of the rib to help cover up all of the flange notches, making it easer to get a tight seal later.


So now I'm back to where I was before I had to replace the rib.  It sure takes a lot of time to unwind steps and fix things, but obviously worth it.  The end rib needs to have an access cover installed, which means a big hole has to be cut out.  Aside from the overall size, this doesn't have to be all that accurate, so I just used a compass to find the center of the hole and drilled a pilot.


I really dislike fly cutters, so I did a test run on my scrap rib to see how it would come out.  It worked fine, so I went ahead and cut the hole in the good rib.

If the temps hold, maybe I'll actually finish the prep work on the fuel tank tomorrow (access covers, vent lines, deburring, etc).