Today I figured out a few things I'll do differently on the next wing, and I also stumbled through some stuff that I'm still not sure how I'll handle it on the next wing. The leading edges are a bear! I started by removing the bottom skins and clecoing the leading edge ribs to the front spar just to get an idea of how all of this was going to go together. As is somewhat common, I found a number of things that didn't quite jive with the plans, but after a little investigation and piecing parts together I got it all sorted out. Most of the leading edge ribs are identical, minus being right or left handed flanges, but a little minor surgery is needed for one of the ribs to clear the spar rivets. I trimmed enough of the flange of the rib to fit around the spar rivets, only realizing after the fact that it probably would have been a whole lot easier to instead drill a hole to fit over the rivet. Oh well, I'll do that on the next wing. The instructions don't mention the need to match drill extra holes in the two inboard ribs, but there are obviously holes in the spar for this, and the plans themselves show rivets there.

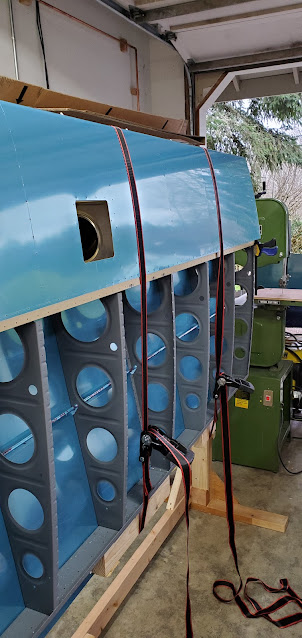
Now for the "fun" part: figuring out how to seat the ribs in the leading edge skin. It's a well known nightmare, and now I see why. The skins are thick, and they are exceptionally tight. Van's says to put everything in a cradle and deal with it there, but just about everyone says it's nearly impossible that way. I had seen an example by a well known builder who put the ribs and skin on the front spar and then used ratchet straps to pull it down and line up all of the holes, starting on the leading edge on the top and working down. I put a 2x4 against the rear spar to spread the load a bit and gave it a shot. It worked well for a few holes, but then it got so tight that I could see the rear spar starting to bend (not enough to deform or anything, but definitely moving). So I gave up on that solution. I think it might have worked if I had left the bottom skins on to help keep the ribs and rear spar more rigid, as well as using a longer 2x4 to spread the load out across a much larger section of the rear spar. I think I will try that on the next wing if I can't find a better way.
I still liked the idea of using ratchet straps, but the execution needs to be different. I tried a similar approach with the leading edge on the bench. This time I extended 2x4s across the rear of the ribs and just ratcheted against those. Unfortunately it didn't have nearly the same effect as when the assembly was on the wing for some reason. It barely moved the skin so the holes (probably 1/4" out) still didn't line up with the ribs.
I finally gave up on the ratchet strap idea and thought I'd give the Van's cradle method a try. I cut my horizontal stabilizer cradles to accept the larger ribs and gave it a shot. Talk about a non-starter. Once you put it all in the cradle the ribs don't budge at all. I huffed and puffed for 30 minutes and might have gotten one cleco in.
The leading edge rib holes are the key to getting these skins to fit. Once you get the first couple of holes done, the rest line up pretty easily. For method 427 I grabbed a clamp, and at least for the end rib, it actually worked really well to bring the nose holes inline. Unfortunately it only works for the end.
It seems like it took forever, but I did finally get all of the ribs pushed into place. I did not learn the magic secret to make the next one any easier. I'll have to do some research to see if anyone has come up with a creative way to handle these. I think the ratchet straps with everything on the wing are a good idea as long as I can figure out a way to keep everything from shifting while I tighten it down.
Once I was done with the leading edge assembly, I transferred it back to the wing and clecoed the ribs in place and the skins to the front spar.