I decided to order a new left side forward fuselage gusset since the holes in the previous one didn't provide enough edge distance for the engine mount bracket. I still have to laugh at the fact that a replacement part like this on a certified plane would probably cost a few hundred bucks. It cost me $7 plus another few bucks in shipping.
I went ahead and riveted the right gusset into place. I was able to do all but a couple of rivets with my squeezer.
There's really no way to get standard edge distances on the engine mount bracket, but Van's says this is the norm and not to worry about it. Edge distance is to keep material from cracking and tearing out, so I suppose it makes sense that steel would have different requirements than aluminum. The other holes in the bracket will stay open until the top skin by the firewall gets put on.
More random stuff - I decided to go ahead and just use the spray can primer on the remaining parts that will go in the tailcone under the top skin. As much as I prefer "real" primer, the convenience of the can is very tempting when there are only a few parts to do.
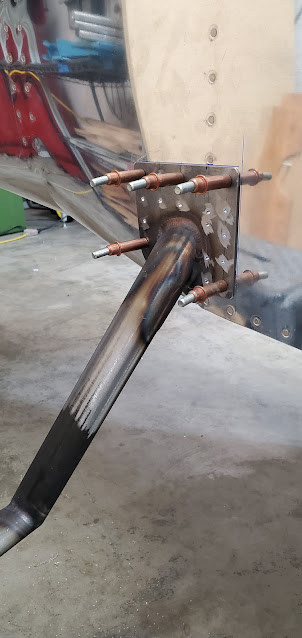
Steps are an option on the 9A, and I decided to put one on each side. The instructions that come with the steps are very old (hand drawn plans that cover as far back as the RV6). The steps have a plate that mates to the side skin and a tube that extends inside underneath the baggage floor, where it fits into a plastic block that is bolted to one of the baggage ribs.
I started with the left side. The first thing I had to do was open up the 1 1/2" hole I had drilled in the side skins a while ago. That's the right size hole for the tube, but it doesn't allow enough room for the weld that attaches the tube to the plate. I finally broke down and bought a Dremel the other day - I wish I had bought that eons ago. It made enlarging the hole so much easier than my previous method of using files.
I laid out the rivet locations on the plate. One of the rivet lines (2nd from the front) has to line up with the F-724 bulkhead inside the baggage area. I moved that line of rivets over about 1/4" from what the plans show so that it would land in the middle of the 724 flange, as well as not hit the external weld of the step. The one gotcha with having to line up with an existing row of rivets is that the rivets in the step plate can't land on top of other rivets or cause edge distance issues with any of them. I had to move two rivet locations to make sure they'd be in okay places. I rounded off the corners of the plate and trimmed the lower aft corner off. This is the area where the fuselage has a big curve and transitions towards the tailcone. I got lucky on this step - normally the aft side of the plate also has to be "massaged" with a hammer to make it lay flat on the skin. I only had to do a little bit of pounding on the aft bottom corner to help it curve with the skin.
I drilled the holes in the plate using the drill press, then clamped the tube and the plastic block to the baggage rib to stabilize it all and drilled the matching holes into the skin.
The plastic blocks need three bolt holes drilled into them - 2 to attach it to the rib and one that goes through the step tube itself.
The right side step ended up being a lot more fiddly than the left side. For some reason it just didn't want to lay against the skin. I ended up having to pound a pretty significant curve into the lower aft corner, but after 100 trips back and for to the vice, I got it to match the skin.
The steps are steel, so definitely need primer to keep them from rusting over the next few years before the plane is painted. Since I'll eventually want to prime them with whatever high quality primer I used with the exterior paint, I didn't spend time scuffing the metal. When it comes time to paint the plane, I'll wipe this primer off the steps (it's the spray can stuff, so acetone takes it right off) and just refinish them with the good stuff. This is the approach I've taken on all of the parts that hang in the breeze and will get hit with paint, like the flap and aileron brackets.
I'll throw a little primer on the skins before I attach the steps. I've seen quite a few RVs with rust that starts at where the step meets the skin. I assume it's because of the dissimilar metals. It's probably not absolutely necessary with both surfaces primed, but I think I'll put a thin layer of proseal under the plate before I rivet it on. I think having that in between the metals will go a long way to keeping the rust from starting.


