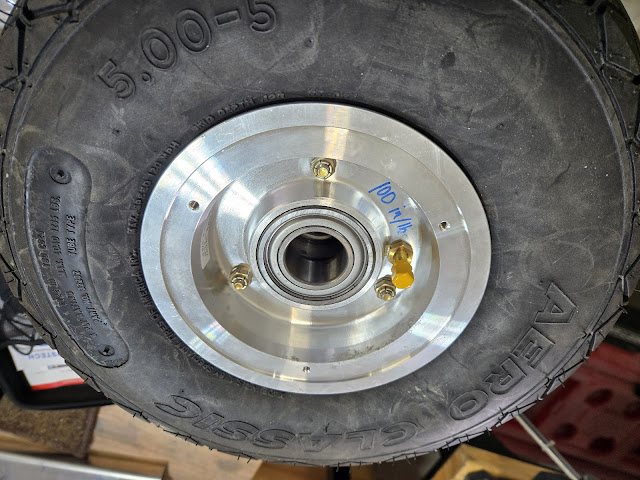
I already received my wheels back from having the bearing modification done. This gave me a new set of things I could accomplish while I'm waiting on my firewall parts. You can see the new sealed bearings they pressed into the wheel (one in each wheel half) in place of the tapered roller bearings that come with the wheels. Having these new bearings will mean I don't have to repack bearings every year, and they should also help to keep the common issue of gear shimmy from happening (due to very finnicky axle nut torque, as well as worn bearings over time). Even though the modification was initially developed for the nose wheel, it's now something the company offers for all wheels. I went ahead and had them do the main gear wheels as well.
The wheels come split in half. I used talc on the tubes and inside of the tires (allows the rubber to slide and minimize the chance of the tube getting wrinkled and caught in between the wheel halves or the tire bead). The valve stem gets placed near a painted dot on the tire which indicates the lightest spot of the tire. I inflated the tube just enough to have shape, then slide it into the tire, put the wheel halves in place, and torqued down the bolts. On the main gear wheels, the bolts also hold on the brake discs.
The nose wheel is a little different than the mains. It gets an axle insert (the blue piece) that slips between the fork, whereas for the main wheels the axle is part of the gear itself.
The other side of the nose wheel has a spacer and a nut. All of this will slip in between the forks of the gear leg.

The fork is a very solid chunk of material, but it was in pretty sorry shape. I spent quite a bit of time trying to polish out all of the dings and cut marks, which I assume were just due to mishandling during manufacturing. It'll all be hidden under a wheel pant, but I didn't want any possible stress risers in it that could potentially lead to cracking. I want to give the fork a protective coat of primer since it'll be exposed to water, and I want to use an epoxy primer, which will be tougher than the typical primer I've used on the rest of the plane. Even though I have a little bit of it left, I'm not really all that sold on the water borne epoxy primer I have used from Stewart Systems. It's just not nearly as tough as an epoxy primer should be. I ordered a quart of Kirker Enduroprime - it's an automotive 2 part epoxy primer that I've heard good things about. Supposedly very tough, but not quite as expensive as the typical aviation epoxy primer. So for now I'll move on from the nose wheel setup.

The main gear axle gets a brake flange bolted to it. This provides an attach point for the brakes themselves. The axle already has a 5/16 hole drilled through it, and the part with the flange has one hole that is the right size and one hole that is undersized. Why they did that, I have no idea. I needed to open up the smaller hole to 5/16, but I didn't want to do that with the part on the axle. I probably could have put the flange on the axle and just used the hole in the axle as a guide, but I was afraid of the possibility of accidentally enlarging the axle hole. I did it on the drill press instead. That worked fine, although the hole (in both left and right gear pieces) was a hair off and made getting the bolt through a bit of a chore.
I still haven't quite wrapped my head around how the brakes attach. The instructions are virtually non-existent, and the single drawing doesn't exactly scream clarity.
Piece by piece I'll figure it out though. Each brake is mated to a piece of aluminum that is used as a mounting point for the wheel fairings. These pieces still haven't been redesigned since Van's switched brands of brakes (20 years ago...), so they don't actually fit as-is. I had to cut a half circle out of each plate so that it would fit around the upper bolt/pin on the brake mounting plate.
I'll probably keep working on the brakes tomorrow. I'll get as much of it done as I can so that once I get the new primer I can just spray the parts and assemble right away. I waffled on whether I should wait to do the brakes and wheels until the gear was installed on the fuselage. I decided it's probably easier to put it all together first so that I only have to lift the plane once to install the gear vs lift it to install the gear, place the center fuselage back on blocks to keep the axles off the ground, then install the wheels and lift the plane again to get it off the blocks.


